YOUR CART
- No products in the cart.
In this article we will talk about the main component when it comes to developing our templates, and that is:
Sp Page Builder Pro offers a lot of functionalities and it’s impossible to cover all of them in this post. This article will cover some basic tips like dealing with rows, adding a new addon, inserting the css etc.
We often get questions about what the backend for a certain Joomla template looks like or some users have problems with some basic settings of the Sp Page Builder.
Please keep in mind that we are presenting the way we work with this component, this doesn’t mean that it’s the only correct way and you cannot work with it differently.
Before we start, we want to let you know that you can test Sp Page Builder Pro’s front end editor here. In order to work fully with the front end editor and edit our addons, keep in mind that you need to erase the styling we inserted in the custom css box from the style tab.
Now let’s see how we work with it.
We begin, of course, with the installing of the component which we have covered in the documentation.
We always work with the back end editor when it comes to developing templates. This doesn’t mean that it’s wrong to work with the front end, everybody can work with Sp Page Builder the way they want.
Again I feel the need to mention that this is not an advanced course for using this component, but just a basic setup, so we are sorry of this is boring to you.
Now, to get on with the job, we click on Sp Page Builder in the administrator panel’s menu and we select pages. We click on the green button that writes “New”, we type the title we want, save it and exit.
Then we go to the menus, select the menu we want and add a new menu. At menu item type we select Sp Page Builder – Page. After this we select the page we created.
Finally we have a page assigned to the menu.
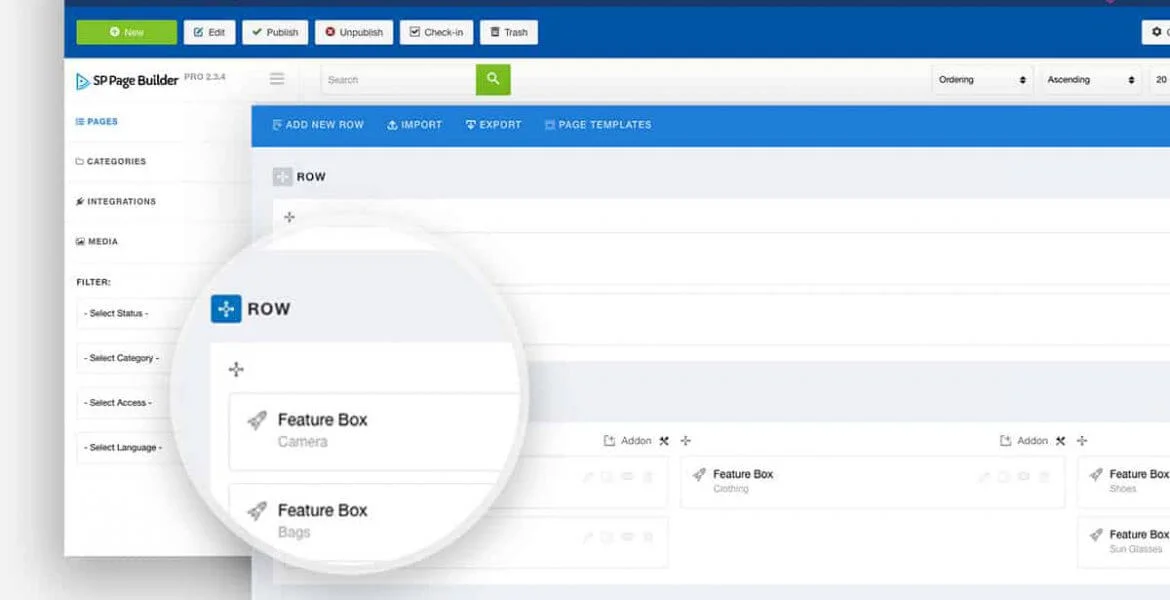
Rows
Now that we assigned the page to the menu, we go back to the page created and add the first row. Click to add the new row and select the preset layout we want or type in the custom layout we want.
On the row options, the general tab, we have the ability to align column items in the center, make a row fluid or remove column gutter.
Where some users encounter problems is finding the background settings of the row. We have them on the second tab, the style tab, where we can also insert the padding.
Columns
Same like in a row, we can insert different padding on the columns, we can insert backgrounds and also we can set up the responsive layout for them.
Addons
In each column, on the top, we have the option to add a new addon. We click on it and select the addon we want.
After this we erase every default setting we find, we go to the style tab scroll down to the css box and start inserting the styling there.
We always use that box for styling and not the default settings in the addon. Again, it’s not a wrong or right practice , you can work with addons differently and it’s total fine.
You can check the below video where you can see all the steps mentioned above. You will understand better what we talked about in this article:
This is how we work with Sp Page Builder Pro to develop premium Joomla templates. We hope we made ourselves understood and you find it easy to work with us. Again, keep in mind that we presented the way we work with the component, this does not mean that it is the only way to work with it. This article was made for you to understand better our templates and this way you will know where to go to edit them.
Stay tuned!
We recently got Joomla 5 compatibility for Helix Ultimate framework and SP Page Builder 5, so in this post we are going to show you how to proceed with the update. Please note that if you are still using SP Page Builder 3, you cannot make the update yet, but don’t worry, we will add […]
We know that you have been thinking about creating an online learning platform recently. Here are some tips for success. 1. Define a target audience and its educational needs, tastes, and goals. 2. Create a clear interface to simplify navigation and access to the course. 3. Work harder to provide the audience with high-quality multimedia […]
As you may know, we are fans of the Sp Page Builder, but we are not that fond of its front end editor. Wheter we are talking about the 3rd or the 4th version, the main bug that prevents us from using and recommend it is the custom css section. Sp Page Builder is very […]
Another question we encounter often is how to get the page title and the breadcrumbs looking like in the demo. You may have noticed that the non-home pages of our demos usually have at the top a title and the link path to the page along side a background image. In this article I will […]
You may be aware of our installation method 2 from the documentation where we provided all the details needed for you to have the template looking like in the demo, but sometimes the users encounter issues following these steps, mainly because they don’t see the changes happening after they take certain steps. Please be aware […]
We often get asked about the available icons in our templates and how can they be customized. In this post I will show you where to find the icons in our templates and how to replace them. First I have to mention that all the templates come with Font Awesome Free icons. Any other icons […]
If you purchased a template from us, you may have noticed that it comes with at least 9 preset colors. 8 presets that are default on Helix Ultimate 2 template and starting with 9 are the preset colors inserted by us. While it is possible to edit these presets inserting your own color, they may […]
In case you want to work with us or are just curious what’s behind our templates, we will let you know in this post and in the next ones the template framework, components and modules we are using to develop our premium website themes. This may be useful in case you like our designs but […]
Many of our customers have lately asked about our templates being compatible with the future big release of Joomla. We answered everybody with an absolutely yes, we are planning to make all of our templates available for Joomla 4. As Joomla developers we have over 100 Joomla templates available, that are made with products from […]
An often request we have is regarding the issue of changes do not take effect when a client modifies the details in the Helix 3 or Helix Ultimate settings. This always happens because if a template has childs, a child template is probably in use for the respective Joomla menu item. For example: Lets say […]
We had a lot of questions lately regarding how someone can modify the css from our templates. We added in our documentation the places where you can find all the styling applied to our Joomla templates, but many people encounter problems in finding those places, especially when it comes to editing the custom.css file. In […]
In case you want to work with us or are just curious what’s behind our templates, we will let you know in this post and in the next ones the template framework, components and modules we are using to develop our premium website themes. This may be useful in case you like our designs but […]
Lorem ipsum dolor sit amet, consectetur adipiscing elit. Etiam porta ut risus necfeu giat. Mauris tincidunt sapien
If you loved our themes and support, you can be sure we are a solution for a long term partnership. Drop us an email anytime and find out more on why you should choose us for your online presence.
We recently got Joomla 5 compatibility for Helix Ultimate framework and SP Page Builder 5, so in this post we are going to show you how to proceed with the update. Please note that if you are still using SP Page Builder 3, you cannot make the update yet, but don’t worry, we will add […]
We know that you have been thinking about creating an online learning platform recently. Here are some tips for success. 1. Define a target audience and its educational needs, tastes, and goals. 2. Create a clear interface to simplify navigation and access to the course. 3. Work harder to provide the audience with high-quality multimedia […]